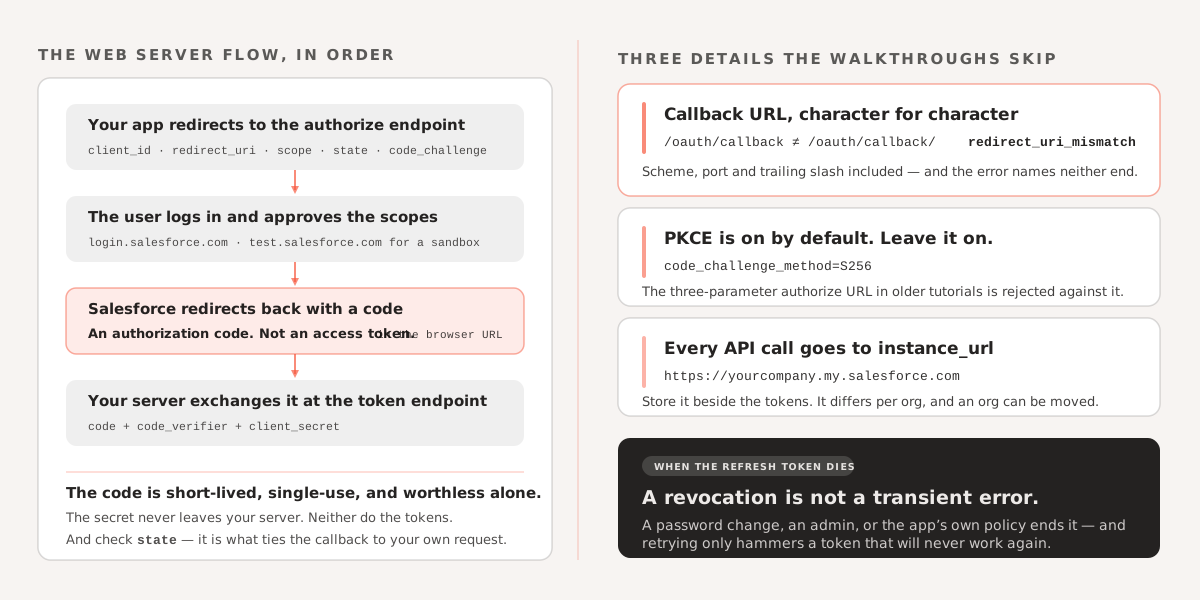
OAuth is how an external application gets permission to act in Salesforce on a user’s behalf, without ever handling that user’s password. The setup is short. The parts that cost people time are three details the walkthroughs tend to skip: PKCE, which is on by default and will reject a request that omits it; instance_url, which you must use for API calls afterwards; and the callback URL, which has to match exactly.
Create the Connected App
In Setup, go to App Manager → New Connected App, and enable OAuth settings.
Callback URL must match what your application sends, character for character — including the scheme, the port, and any trailing slash. http://localhost:3000/oauth/callback and http://localhost:3000/oauth/callback/ are different URLs, and a mismatch produces redirect_uri_mismatch with no hint as to which end is wrong.
Scopes should be the minimum the application actually needs. Two are worth understanding rather than copying: refresh_token (also shown as offline_access) is what makes Salesforce issue a refresh token at all — without it your access token expires and the user has to log in again. And full is almost never the right answer; it grants everything the user can do.
PKCE is the setting to look at before you write any code. Require Proof Key for Code Exchange (PKCE) Extension for Supported Authorization Flows is enabled by default on new Connected Apps. Leave it on — it is the current standard for the web server flow — but note that the classic three-parameter authorize URL you will find in older tutorials will be rejected against it.
Save, then collect the Consumer Key and Consumer Secret from the app’s detail page. Give it ten minutes before you test; Connected App changes take a few minutes to propagate, and testing immediately produces confusing errors that resolve themselves.
What actually happens in the flow
Worth being precise here, because this is the step most often described wrongly:
- Your app redirects the user to Salesforce’s authorize endpoint with your client ID, callback URL, and a code challenge.
- The user logs in and approves the requested scopes.
- Salesforce redirects back to your callback URL with an authorization code — not an access token.
- Your server exchanges that code, plus the code verifier and your client secret, for the tokens.
The distinction in step 3 matters. The code arrives in the browser’s URL, where it is visible in history and logs, which is why it is short-lived, single-use, and worthless without the secret held on your server.
The token response gives you access_token, refresh_token (if you asked for that scope), and instance_url.
A working example
This uses Node’s built-in fetch and crypto, so it needs no dependencies beyond Express. The request package that older examples use has been deprecated since 2020.
const express = require('express');
const crypto = require('crypto');
const app = express();

const clientId = '<your_consumer_key>';
const clientSecret = '<your_consumer_secret>';
const redirectUri = 'http://localhost:3000/oauth/callback';
const loginUrl = 'https://login.salesforce.com';  // test.salesforce.com for sandboxes

const base64url = (buf) => buf.toString('base64url');
const pending = new Map();  // demo only — use a session store

app.get('/', (req, res) => {
  const verifier = base64url(crypto.randomBytes(32));
  const challenge = base64url(crypto.createHash('sha256').update(verifier).digest());
  const state = base64url(crypto.randomBytes(16));

  pending.set(state, verifier);

  const params = new URLSearchParams({
    response_type: 'code',
    client_id: clientId,
    redirect_uri: redirectUri,
    scope: 'api refresh_token',
    state,
    code_challenge: challenge,
    code_challenge_method: 'S256',
  });

  res.redirect(`${loginUrl}/services/oauth2/authorize?${params}`);
});

app.get('/oauth/callback', async (req, res) => {
  const { code, state } = req.query;
  const verifier = pending.get(state);

  if (!verifier) {
    return res.status(400).send('Unknown or expired state');
  }
  pending.delete(state);

  const response = await fetch(`${loginUrl}/services/oauth2/token`, {
    method: 'POST',
    headers: { 'Content-Type': 'application/x-www-form-urlencoded' },
    body: new URLSearchParams({
      grant_type: 'authorization_code',
      code,
      client_id: clientId,
      client_secret: clientSecret,
      redirect_uri: redirectUri,
      code_verifier: verifier,
    }),
  });

  const tokens = await response.json();

  if (!response.ok) {
    return res.status(400).send(`${tokens.error}: ${tokens.error_description}`);
  }

  // Store tokens server-side, keyed to your own session. Never send them to the browser.
  req.session = tokens;
  res.send('Connected to Salesforce.');
});

app.listen(3000, () => console.log('Server started on port 3000'));
The state parameter is not optional decoration. It ties the callback back to the request that started it, and without checking it, your callback will process an authorization code that an attacker obtained elsewhere.
Use instance_url, not login.salesforce.com
This is the one that catches almost everyone on their first API call. login.salesforce.com is for authentication only. The token response contains an instance_url — something like https://yourcompany.my.salesforce.com — and that is the host every subsequent API request goes to:
const result = await fetch(`${tokens.instance_url}/services/data/v59.0/query?q=SELECT+Id+FROM+Account`, {
  headers: { Authorization: `Bearer ${tokens.access_token}` },
});
Store instance_url alongside the tokens rather than deriving it. It differs per org, and it can change when an org is migrated between instances.
Refresh tokens, and how they end
Access tokens expire on a schedule set by the org’s session settings. When one does, exchange the refresh token for a new access token — same endpoint, grant_type=refresh_token, no user interaction.
Refresh tokens do not last forever either. They are revoked when the user changes their password, when an admin revokes the app’s access, and according to the Connected App’s own refresh token policy. Handle that path deliberately: a revoked refresh token means sending the user back through the authorization flow, and an integration that treats it as a transient error will retry against a token that is never going to work again.
If you are building a connected app and need help with OAuth configuration, integration architecture, or security review, see how we approach Salesforce integrations.